Geography 336 Sandbox creation
Creating and surveying points throughout a man made diagram
Dillan Berg
Background:
 |
| Figure 1.1: Sculpting our sandbox to specifications previously determined |
The task our group was faced with was to design and survey our own structures within a 114cm x 122 cm sandbox. The parameters that our group was given was that we needed to included a ridge (elongated structure with a high point), valley (depressed that is longer than it is wide), a depression ( inverted hill), hill ( a elevated area that is not as long as it is wide), and a plane ( a flat area that ranges over a long distance).After construction of the features where built we were tasked to come up with our own form of surveying the features accurately and efficiently. Meaning we needed to have enough points to accurately show all the features but not to many to over collect and have faulty data.
Methods:
We decided to take our total box which was originally 114cm x 122cm and cut off 1 cm from each side so we could accurately measure each grid. The new area of the box is 112 cm x 120cm.We then made grinds on both sides every 8cm, this allowed us to have a total of 210 sections within the total area to measure for elevation. We decided to keep accurate measurements by labeling the top of the grid by letters and the side by numbers. We then made each measurement within the grid in the lower right corner of each square. Since the features where all below the string we collected all negative numbers. To make the analysis easier in future applications we measured the width of the boards and added the width to all collected measurements. This helped by making all of our data points positive numbers but also keep accurate measurements of the true heights.
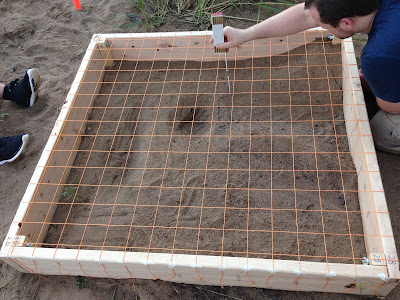 Figure 1.2 Demonstrates the grid layout and our collection methods.
By labeling the top in letters and side in numbers it allowed for quick and easy entry into our excel spreed sheet. Once in excel we where able to transform the data by adding 18.4 cm to each measurement resulting in our final collection.
 Figure 1.3 Final data points of sandbox collected in cm


No comments:
Post a Comment